I’ve had a lot of questions about smoking lately. As in smoking meats and fish.
What a lot of people don’t think about is that you can actually smoke different vegetables, fruits, and even liquids.
It’s by far one of my favorite ways to cook foods. From the more traditional meats, such as a pork butt (shoulder) and ribs, to more…untraditional meats, such as smoked bear roast or a beef chuck shoulder, all are great recipients of smoking. I’ve even smoked steaks a couple times before grilling them.

There are several different variations and techniques you can use but to make it more simple, I’ll categorize them into Hot smoking and Cold smoking. (RIBSSSSS to the left!)
Hot smoking is a much shorter cooking time and is usually used for food that you intend to eat without much more preparation done to it, such as Canadian bacon or salami for sandwiches. Hot smoking can usually last anywhere from an hour to 12 hours, depending on the meat.
Cold smokes are generally used for meats that you want a deep smoke flavor to it but don’t want to lose any fats or juices in the meat before you cook it.
For instance, if you cold smoke pork belly (bacon), fat starts rendering off the meat at about 90 degrees so you don’t want the temperature up too much higher than that. Many books will define cold smoking at a temperature below 90-100 degrees but if you keep the temperature below 110, it wouldn’t hurt the food too much.
I try and maintain 100 degrees if I don’t have time to wait around for a couple days. You can also go as low as 55 degrees for 2 or 3 days if you do have the time.
The time table for cold smoking is significantly longer, as I mentioned.
If you were to smoke pork belly with the hot method, it would probably take about 3 hours but with a cold smoke you’re looking at closer to 8 or 9 hours. Just remember that with cold smoking, you still have to cook your meats.

Hot smoking has several different methods to it. (I typed hot smoking into google and this is what it came up with. James Franco smoking. You’re welcome)
Anyway, when you’re dealing with fish or meats, you usually want to do a brine first.
This is a step that is pretty crucial to most meats but really is quite easy. All you do is soak your meat in some kind of liquid flavored with salt, sugar, and your choice of herbs or spices for anywhere between 4 hours to 24 hours.
Brining meats helps keep your meat juicy while cooking through a process called osmosis, meaning anything placed into a hypotonic, saline solution gains water by switching liquids inside the meat without any salt with liquids outside the meat with a bunch of salt until the liquids are equal. These water molecules that are carrying the salt get trapped in between muscle fibers along with the sugar and whatever other spices you put in there.
If you keep your meat in a brine for too long, it’ll actually lose moisture.
Meats such as fish are usually good in a brine for 4-8 hours but big, bone-in turkeys need to stay in a brine overnight, up to 24 hours. No longer than that, though. Your turkey will actually be way too salty if you do it for too long. When you’re brining big meats, I like to use buckets filled with brine and ice.
Also, try to use kosher or pickling salt instead of regular table salt. Table salt has iodine in it which can lend a funky taste. You can stick it in a cool garage or somewhere else in your house that’s out of the way but not too hot since your fridge probably won’t fit a giant 5 gallon bucket.
 The next step you need to do is to wash off your meat out of the brine, pat dry, let it sit on the counter to come up closer to room temperature, and rub the meat with a spice mix of your choice.

If you’re dealing with salmon, try brown sugar, salt, and pepper. It’s delicious.
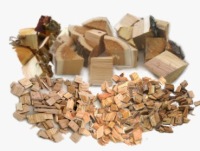
Also, you need to choose a wood to smoke with and you need to decide if you’re using wood chips, chunks, or a small log. Using a small log in your smoker will actually give you a small, but noticeable, difference in taste since it burns different than smaller chunks or wood chips.
Look for golf ball sized chunks of wood when smoking since it won’t degrade too fast if you’re using an actual smoker. If you use wood chips, they burn up pretty fast. This forces you to open your smoker to check if you need to add more, lowering the internal temperature inside. It’s not a bad choice, just less convenient.
If you’re using a sizable chunk of wood, you might want to soak it in water for a half hour before, also.
Put the wood in the compartment above the heating element and wait for it to come up to temperature, around 225 degrees. When choosing wood, any type will do but keep in mind how strong of a smokey flavor you want on your meat. Woods like hickory and mesquite lend a very strong flavor to meats, which is very suitable to beef chuck roasts but not so much to mild fish like halibut.
More mild woods are plum, cherry, or apple. My favorite mild wood is cherry and my favorite stronger flavored wood is alder wood, which is indigenous to South East Alaska where I’ve smoked huge amounts of salmon. It’s not as strong as mesquite but it’s a nice happy medium.

Now add your meat straight onto the rack. If you’re smoking delicate meats, make a tray that will fit your meat out of aluminum foil and poke small holes in the bottom for the juices to drain. Cook until your meat reaches the desired cooking temperatures.
Pork should be cooked to at least 145 degrees, as should salmon, but going higher is definitely going to happen if you’re going to smoke for hours.
If you’re cooking ribs or anything that’s not too delicate, make sure your wrap your meat in aluminum foil and seal it tightly a couple hours before it’s done. This will help break down any other fibers in the meat.
A half hour before it’s done, pull it out of the foil and baste it with BBQ sauce. Put it back on the heat to finish cooking. If you’re cooking bear at a slow pace, cook it to at least 155 F, if not more.
Some people do it to 170 but I think that dries it out way too much. Also, if your meat you’re using is really oily from being gamey (i.e. bear meat, elk, deer, different pheasants), turn on your smoker and let it get to the temperature you want.
Don’t add your wood until you think enough juice has come out. This will ensure your end product doesn’t have an enormously unpleasant taste to it.
Some people cook it for hours before they add the smoke or if you’re doing strip jerky, cook a whole roast a couple hours in the smoker before cutting it up and drying it out.
 If you want a really nice crust on your food, such as Smoked Prime Rib Roast, smoke it until it comes to a temperature about 30 degrees below the final temperature.
Crank up your oven to 400-425 degrees. When you put your food in, turn the oven off and just let it sit in there. Between 10-15 minutes is usually good.
Now let your meat rest on the counter top for about 15 minutes to a half hour. This is important for the meat to stop rising in temperature and for the juices to evenly distribute again (Pictured Left, this is what it should look like). 125 degrees is considered rare, 135-145 is about medium and anything above that, just cut it into rib-eye steaks to cook on the grill or pick another meat to cook like this.
Also, while you’re doing all of this, you can add onions, carrots, potatoes, or any other starchy vegetable you’d like to accompany your meal. You can even add onions straight to the wood while smoking. The blackened onions have a pretty distinguishable taste to it.
You can also regulate your temperature in your smoker if your using a direct heating element.
This can be done with things like charcoal to heat your wood using water. Put a small pan of water on the tray over the wood. This helps keep hot spots distributed and keeps the temperature of the smoker more consistent. You really have to make sure the temperature isn’t way overboard, though.
 The water can make it too moist, lessening the caramelization on the surface of your meat, otherwise known as your bark (Pictured Left).
Bark is the mahogany, almost blackened color of meats that have been smoked a really long time. If you’re using a regulated smoker and you’re confident it’s actually at the temperature it says, this isn’t necessary.
I keep an oven thermometer in any smoker I’m using. A good way to keep your meat from drying out is to spray it down with some kind of liquid when you’re checking the wood. The liquid you cold smoke is a perfect liquid to use, which I explain later.
It can be vinegar, beer, wine, or just plain water. Some people say to spray your meat every hour to make sure it doesn’t burn but remember that every time you open the door to the smoker, you lose heat. I do it every three to four hours when I’m checking the wood unless it’s delicate meat that isn’t cooking that long.
Cold smoking is basically the same exact process except for checking when it’s done or not.
You still have to cook the meat you’ve smoked in this process some way. It’s basically where you let wood chips smolder to produce smoke without any kind of central heating element to keep temperatures up in your smoker.
A good way to keep the temperature down is to put a small pan of ice in the smoker. It’ll help maintain a cooler temperature. This process also lends itself to smoking BBQ sauces and other liquids. I’ve smoked beer and used that liquid to baste other meats before. Since the temperature isn’t actually at boiling or steaming point, your water won’t evaporate and the residues from the smoke will actually end up in the water or sauces.
I’ve had people ask me why I don’t just use liquid smoke since it’s essentially the same thing. I find it way too strong and the taste isn’t very pleasant to me. Plus, there was an incident with a broken bottle of liquid smoke. I made me have a recurring headache for a couple days afterwards.
 A good friend of mine explained how to cold smoke sockeye salmon in Hoonah, Alaska once with a tasting of the results.
He smoked his at 70 degrees for 2 days and actually cured his salmon for 24 hours before smoking the fish with alder wood.
Curing is just salts, sugars, and different nitrates covered onto a meat to preserve it.
You’d want to rub the cure on and refrigerate it for up to 36 hours. I go less than that since I think it gets too salty at that point. The chemical in curing makes most meats incredibly red or pink. My friend’s salmon look very different than regular smoked salmon. This is what corned beef is. It is also linked to a couple of pretty distinguishable diseases if you eat too much of it, though.
You can buy curing salts in most grocery stores. After you cure the meat, you have to dry it out for another 12 to 24 hours until sticky and dry-feeling in a fridge. You can also cold smoke cheeses, nuts, deli meats, and anything in between.
 When you’re looking to buy a smoker, check the prices and decide what you need.

The cheapest end will run you 30 bucks but are tiny and won’t last long. The nicer ones with gauges and ball valves will probably run you 600 bucks. They help you control how much smoke escapes.
There are even nicer ones that run upwards of a couple thousand. If you’re a handy man, you can always build your own. This is what I’ve done in the past for people and plan to do again.
All you need are 5 different components to start with.
You need some kind of enclosure, which can be anything from an old steel cabinet to a 55 gallon drum. You can use pretty much anything as long as it’s food-safe and can hold up to higher temperatures. I’ve even seen someone make one out of a beer keg.
You also need some food grade racks to hold your food. Make sure you have some kind of drip tray to catch all the liquid that comes off your meat. These can be simple stainless steel racks or pan grates with a stainless steel pan beneath them. You need an oven thermometer. This can be a cheap one that you just put on a rack next to the meat. It is nice to have a nicer gauge thermometer that drills into the barrel side, though.
The last thing you need is something that holds your coals and wood.
I just use a cast-iron pan that I already had but you could definitely make a metal box for this. The other thing you probably need but isn’t necessarily needed is an electric heating element.
This will keep the temperature in the smoker at a consistent heat. You will not have to fuss with your wood and coals so much. Creating smoke could be a simple electric hot plate (the kind poor college students use in their dorms). It could be a little more advanced with a heating rod right below your wood box. Both are incredibly cheap.
You could probably get your entire smoker made for cheaper than 100 bucks. The manufactured ones are incredibly nice to work with, though. If you have the money to blow on a nice smoker, it’s definitely a nice thing to have. These usually have nifty vents that help you control how hot the smoker is.
You can also use your grill. Make a jerry-rigged smoker by wrapping your wood in foil and poking a bunch of holes in it. Light one or two of the burners and put the wood close to the fire.
Do not put it close enough to catch it on fire.
Put a pan of water above the flame on the grids and put your meat on. Through the cooking process, keep an eye on the water and have a back up package of wood. Either way, pretty simple.
There is an entire science among Pit Master communities that is dedicated to this craft. I could probably write several books on this subject. If you dive deeper into smoking, you’ll get into chemical burning of woods. You will also see what spices make better barks but I won’t confuse you with that right now.
I suggest that you start out simple.
Try smoking in your grill you already have at home. Follow the directions I’ve set and if you feel comfortable with that, move up to more advanced meats and techniques. If someone has a different specific question, feel free to ask in the comments below. Happy smoking! (meats that is). By the way, the picture to the left is just down the road from where I’m at in the arctic. Most of the snow is gone by now and replaced with lakes and streams.